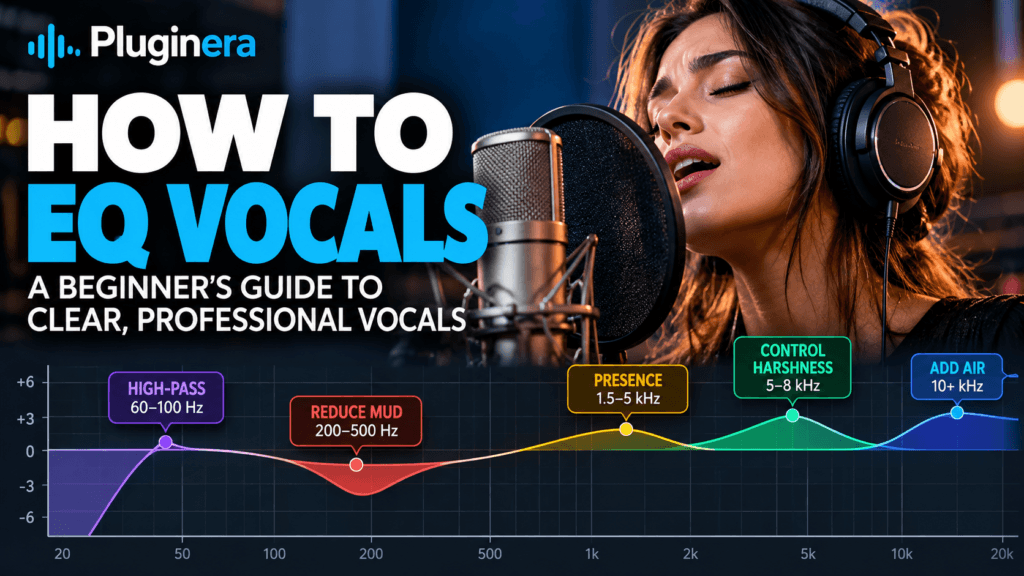
 How to EQ Vocals: A Beginner’s Guide to Clear, Professional Vocals
Learning how to EQ vocals is one of the most important skills you can develop as a music producer or mixing engineer.
You can have great drums, beautiful chords, and an expensive collection of plugins, but if the vocal sounds muddy, harsh, thin, or buried behind the instrumental, the entire mix can feel unfinished.
The good news is that getting clearer vocals doesn’t necessarily require an expensive vocal chain.
A stock parametric EQ inside your DAW is often more than capable of doing the job.
The real skill is learning what you’re listening for, where to look for it, and knowing when you’ve done enough.
In this beginner’s guide, we’ll walk through a practical approach to EQing vocals without relying on complicated presets or expensive plugins.
What Does EQ Do to a Vocal?
An equalizer allows you to increase or decrease specific frequency ranges within a sound.
Instead of simply turning the entire vocal up or down, EQ lets you change its tonal balance.
For example, you might use EQ to:
- Remove unnecessary low-frequency rumble
- Reduce muddiness
- Control boxiness or nasal frequencies
- Improve vocal clarity
- Reduce harshness
- Add presence
- Add brightness and air
But there’s an important distinction to understand.
EQ shouldn’t automatically mean changing the vocal.
Sometimes a vocal already sounds good.
The purpose of EQ is to solve a problem or intentionally shape the sound—not to add processing simply because you think every vocal needs it.
Step 1: Listen Before Touching the EQ
Before inserting an EQ, listen to the vocal in the context of the song.
Ask yourself:
What is actually wrong with it?
Does it sound muddy?
Too dark?
Harsh?
Thin?
Is it difficult to understand?
Does it sound good by itself but disappear once the instrumental starts playing?
Those questions give your EQ decisions a purpose.
One of the easiest mistakes beginners make is opening an EQ and immediately moving bands around because they’ve seen someone else use those settings.
Instead, try to develop this habit:
Hear the problem first. Then reach for the tool.
That mindset will eventually make mixing much faster.
Step 2: Remove Unnecessary Low Frequencies
Vocals can contain low-frequency information that contributes very little to the actual performance.
This can include room rumble, microphone handling noise, plosives, and other unwanted low-frequency energy.
A high-pass filter can help remove it.
A high-pass filter allows frequencies above the cutoff point to pass while reducing frequencies below it.
You might begin somewhere around 60–100 Hz and slowly move the filter upward while listening.
Don’t blindly set it to a particular frequency because you saw that number in a tutorial.
Move the filter until you begin hearing the vocal lose some of its natural weight or body.
Then back the filter down.
The goal isn’t to make the vocal thin.
You’re simply trying to remove frequencies that aren’t helping the recording.
This is especially important when bass instruments and kick drums also need room in the lower frequencies.
Step 3: Check the Vocal for Mud
One of the most common problems you’ll encounter is a vocal that sounds muddy.
Mud often lives somewhere in the low-midrange, roughly around 200–500 Hz.
That doesn’t mean you should automatically cut 300 Hz from every vocal.
Instead, listen for a buildup that makes the singer sound cloudy, overly thick, or as though something is covering the vocal.
A useful technique is temporarily boosting a bell EQ and sweeping through the low-midrange.
When the unpleasant characteristic becomes exaggerated, you’ve probably located the general problem area.
Now turn that boost into a cut.
And here’s where beginners frequently go too far.
You might not need a huge cut.
Try something subtle first.
A reduction of only 1–3 dB can sometimes clean up the vocal considerably while preserving its natural body.
Don’t Remove the Vocal’s Body
The low-midrange isn’t inherently bad.
It also contains warmth and body.
If you aggressively remove those frequencies simply because you’ve been told they’re “mud,” the vocal can quickly become thin.
That’s why bypassing your EQ periodically is important.
Ask:
Did I make the vocal clearer—or did I just make it thinner?
Those aren’t the same thing.
Step 4: Listen for Boxiness and Nasal Frequencies
Moving upward through the frequency spectrum, you may encounter vocals that sound boxy, honky, or nasal.
The exact frequency will vary dramatically depending on the singer, microphone, recording environment, and performance.
Rather than memorizing one magic frequency, learn the characteristics.
Boxiness can make the singer sound like they were recorded inside a small enclosed space.
Nasality can make the vocal sound pinched or overly focused through the nose.
Sweep carefully through the midrange if you hear either characteristic.
Once you locate the problem, try a small cut and listen again in the mix.
Don’t try to make the vocal sound unnaturally perfect in solo.
Your audience will hear the vocal alongside the music.
That’s the environment where your final decision matters.
Step 5: Use Presence to Help the Vocal Come Forward
If the vocal sounds slightly buried behind the instrumental, you may need more presence.
The roughly 1.5–5 kHz region plays an important role in vocal intelligibility and presence.
A small boost somewhere within this region can sometimes make a vocal feel closer to the listener without dramatically increasing its overall volume.
But this range requires restraint.
Too much presence can quickly make a vocal sound aggressive or harsh.
Try small moves.
You may discover that 1 dB accomplishes everything you need.
There’s another possibility worth considering too:
Instead of boosting the vocal, you may be able to make a small cut in an instrument that’s masking it.
For example, if a synth, guitar, or piano occupies the same presence region as the vocal, slightly reducing that instrument can create space for the singer.
That’s one of the fundamental ideas behind mixing:
Sometimes you make one sound clearer by changing something else.
Step 6: Control Harshness Before Adding More Brightness
A vocal can be clear and still become uncomfortable to listen to.
Harshness frequently appears in the upper-midrange and high frequencies.
Listen carefully as the singer gets louder.
Certain words or notes may suddenly jump forward and feel sharp.
If you hear that problem, locate the offending frequency and try a small cut.
This is also where dynamic EQ can become extremely useful.
Instead of permanently cutting a frequency from the entire performance, dynamic EQ can reduce that frequency only when it becomes excessive.
That allows you to preserve the natural tone during the rest of the performance.
You don’t need dynamic EQ to get a professional vocal, but understanding why you might use it is much more important than simply inserting one because a tutorial told you to.
Step 7: Watch the Sibilance Area
Sibilance is the sharp sound created by consonants such as S and sometimes T.
It commonly becomes noticeable somewhere around 5–8 kHz, although every singer is different.
You can reduce excessive sibilance with EQ, but there’s a potential problem.
A permanent EQ cut might make the entire vocal darker just to control a problem that happens on a few words.
That’s why a de-esser is often a better solution.
A de-esser essentially reduces the problematic high-frequency energy when sibilance becomes excessive while leaving more of the remaining performance intact.
If your vocal sounds good except for occasional sharp S sounds, consider de-essing before making a large static EQ cut.
Step 8: Add Air If the Vocal Needs It
Sometimes a vocal isn’t muddy or harsh—it simply sounds a little dull.
This is where adding air can help.
The upper frequencies, often around 10 kHz and above, can contribute a sense of openness, polish, and brightness.
Try using a gentle high-shelf boost.
Again, subtlety matters.
You aren’t trying to make the vocal painfully bright.
You’re trying to make it feel slightly more open.
If adding air suddenly makes the vocal excessively sibilant, however, you may need to reconsider the boost or combine it with de-essing.
Step 9: EQ Your Vocal in the Context of the Mix
This might be the most important lesson in this entire guide.
Mix the vocal with the music playing.
Solo can be useful for identifying noises or resonances, but your final EQ decisions should make sense within the complete mix.
A vocal that sounds slightly thin by itself might sit perfectly once the bass, drums, synths, and other instruments are playing.
Likewise, a vocal that sounds huge and beautiful in solo might completely overpower the instrumental.
The goal isn’t to create the world’s greatest soloed vocal.
The goal is to create a great mix.
Should You EQ Before or After Compression?
You’ll frequently see debates about whether EQ should come before or after compression.
Both approaches can work.
EQ Before Compression
Corrective EQ before compression can remove frequencies you don’t want triggering the compressor.
For example, if the recording contains excessive low-frequency energy, removing some of it before compression can change how the compressor responds to the vocal.
This approach makes sense when you’re thinking:
Clean the signal first, then control its dynamics.
EQ After Compression
Compression can also change the perceived tonal balance of a vocal.
After compressing the performance, you might discover that the vocal needs additional brightness, less mud, or slightly more presence.
An EQ after the compressor lets you shape the resulting compressed sound.
You Can Use Both
There’s nothing wrong with using two EQs.
You might use:
EQ → Compressor → EQ
The first EQ handles corrective work.
The compressor controls dynamics.
The second EQ handles tonal shaping.
Don’t worry about whether using two EQs is “wrong.”
Ask whether each processor has a purpose.
Why Small EQ Moves Matter
When you’re learning to EQ, dramatic boosts and cuts make frequency differences easier to hear.
But once you’ve identified the problem, you often don’t need such aggressive processing.
A 1 dB cut can matter.
A 1.5 dB boost can matter.
Sometimes, the difference between a vocal feeling slightly muddy and sitting beautifully in front of the instrumental is surprisingly small.
That’s why level-matched bypass comparisons are valuable.
Turn your EQ off.
Listen.
Turn it back on.
Listen again.
Don’t automatically choose the processed version simply because you worked on it.
Ask yourself:
Does this actually sound better?
If the answer isn’t clear, you might not need the move.
Do You Need an Expensive EQ Plugin for Vocals?
No.
Premium EQ plugins can provide useful features, different workflows, analog-style coloration, dynamic processing, and excellent interfaces.
But the fundamental job of an EQ remains the same:
Adjust the balance of frequencies.
If your DAW includes a capable parametric EQ, you already have what you need to start learning vocal EQ.
The expensive plugin won’t decide whether 350 Hz needs to be cut.
Your ears will.
Learning to identify muddiness, harshness, masking, presence, and tonal balance will improve your mixes regardless of which EQ you use.
That’s why learning your stock tools can be one of the smartest things you do as a beginner.
A Simple Vocal EQ Starting Workflow
When you load your next vocal, try this process:
- Listen to the vocal with the entire mix playing.
- Identify the problem before touching the EQ.
- Remove unnecessary low-frequency information if needed.
- Check the low-midrange for excessive mud.
- Listen for boxiness or nasal resonances.
- Decide whether the vocal needs more presence.
- Control harsh frequencies rather than blindly boosting brightness.
- Deal with sibilance if necessary.
- Add air only if the vocal actually needs it.
- Bypass your EQ and confirm that your changes improved the mix.
Most importantly, don’t feel obligated to complete every step.
If Step 3 solves the problem, stop.
Processing isn’t a checklist you have to finish.
Final Thoughts
Learning how to EQ vocals isn’t really about memorizing frequencies.
Knowing that mud commonly appears in the low-midrange or that presence lives higher in the spectrum gives you useful starting points, but those numbers can’t make the decision for you.
The real skill is learning to recognize what you’re hearing.
Eventually, you’ll stop thinking:
“Someone told me to cut 300 Hz.”
And start thinking:
“This vocal sounds muddy. Let me find out where that mud is coming from.”
That’s the difference between following an EQ recipe and actually learning how to mix.
And you don’t need an expensive studio or a massive plugin collection to develop that skill.
You need a DAW, an EQ, a pair of headphones or monitors you know well—and practice.
Listen.
Make a small move.
Bypass it.
Listen again.
That’s how your ears get better.