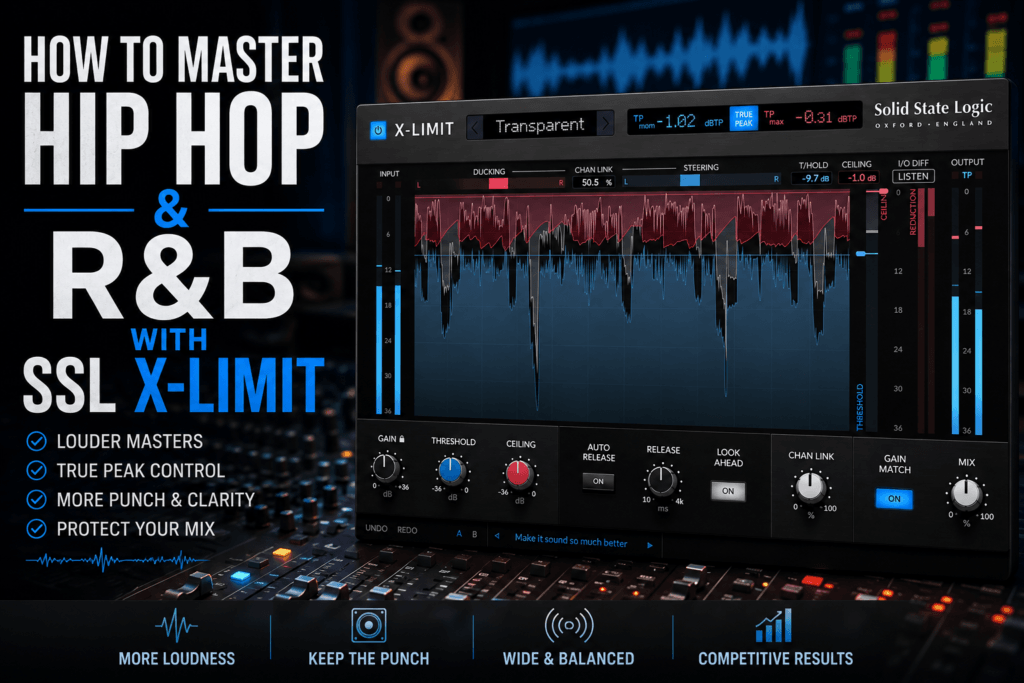
 Mastering Hip Hop and R&B can feel like a balancing act.
You want the record to sound loud, polished, wide, and competitive, but you don’t want to destroy the punch of the drums, bury the 808, flatten the vocals, or remove the dynamics that give the song its groove.
The final limiter plays a major role in that balance.
That’s exactly where SSL X-Limit comes into the picture.
Solid State Logic’s X-Limit combines True Peak limiting with four different limiting styles—Transparent, Glue, Punch, and Auto—along with controls for Threshold, Ceiling, Release, Lookahead, Channel Link, Gain Match, and more.
That makes it capable of doing considerably more than simply preventing your master from clipping.
In this guide, we’ll walk through how to master Hip Hop and R&B with SSL X-Limit, including where to place it in your mastering chain, which modes to use, how much limiting to apply, and how to keep your drums and low end intact while increasing loudness.
What Is SSL X-Limit Doing During Mastering?
Before touching any settings, it’s important to understand the limiter’s job.
A limiter controls the loudest peaks of your music.
As those peaks are reduced, you gain room to increase the overall level of the song.
That’s how limiting contributes to perceived loudness.
The problem is that those peaks often contain some of the most important elements in Hip Hop and R&B.
Think about:
- Kick transients
- Snare attacks
- 808 peaks
- Vocal accents
- Percussion
- Bass notes
Push the limiter too hard and those elements can lose their impact.
That’s why mastering isn’t simply about asking:
“How loud can I make this?”
A better question is:
“How loud can I make this while keeping everything I like about the mix?”
That’s the mindset we’re going to use with X-Limit.
Step 1: Make Sure the Mix Is Ready for Mastering
Don’t start mastering until the mix works.
A limiter shouldn’t be used to repair major mixing problems.
Before opening X-Limit, listen to your mix and ask:
Does the kick cut through?
Is the 808 controlled?
Can I clearly hear the vocal?
Are the highs harsh?
Is the low end muddy?
Is anything clipping?
Does the chorus feel bigger than the verse?
If something is obviously wrong, go back to the mix.
That’s usually better than trying to solve everything during mastering.
Step 2: Leave Yourself Some Headroom
You don’t need to make the premaster extremely quiet, but you also don’t want uncontrolled clipping before the signal reaches your mastering chain.
A healthy premaster gives your mastering processors room to work.
Don’t obsess over hitting one magical peak level.
Instead, make sure the mix isn’t unintentionally clipping and that you’re not already crushing it with excessive processing.
X-Limit will handle the final peak control.
Step 3: Build a Simple Mastering Chain
You don’t need fifteen plugins to master a beat or song.
A basic mastering chain might look like this:
EQ → Compression → Saturation/Clipping → SSL X-Limit
Each processor has a specific job.
EQ
Use EQ to make broad tonal adjustments.
Maybe the master needs slightly more air.
Maybe the low mids are muddy.
Maybe the top end is slightly aggressive.
These should usually be subtle changes.
Compression
Master-bus compression can help control dynamics and create cohesion.
Again, subtlety matters.
We’re not trying to completely reshape the mix.
Saturation or Clipping
Saturation can add harmonics and perceived density.
A clipper can also shave extremely fast peaks before they reach X-Limit.
This can be particularly useful in Hip Hop because kicks and snares often create huge transient spikes.
SSL X-Limit
X-Limit then handles the final peak control and loudness.
In most mastering situations, I’d place it near or at the end of the chain.
Step 4: Start with Transparent Mode
X-Limit provides four limiting styles:
Transparent
Glue
Punch
Auto
For mastering, I’d generally begin with Transparent.
Why?
Because if you’ve already spent hours getting the mix right, you probably don’t want the final limiter dramatically changing it.
Transparent mode gives you a relatively clean starting point.
The goal is:
Same mix. More controlled. More polished. Louder.
Once you understand how Transparent reacts to your track, you can experiment with the other modes.
Step 5: Set the Ceiling
The Ceiling determines the maximum output level you’re targeting.
For streaming-oriented masters, a common starting point is somewhere around:
-1.0 dBTP
You may also experiment with something such as:
-0.5 dBTP
or another value depending on your intended delivery format.
The important thing is understanding that the Ceiling isn’t your loudness control.
It establishes your output limit.
Your Threshold and Gain determine how aggressively you’re pushing the signal into limiting.
Step 6: Enable True Peak Limiting
For final mastering, True Peak limiting is one of X-Limit’s most useful features.
Here’s why.
Digital audio can produce inter-sample peaks during playback and conversion.
Your normal sample-peak meter may suggest that nothing exceeds the ceiling, yet reconstruction of the waveform can potentially create higher peaks.
True Peak processing is designed to account for that behavior.
For a final streaming master, I’d generally enable True Peak.
X-Limit provides True Peak monitoring so you can keep an eye on the resulting peak levels as you work.
Step 7: Start Increasing the Loudness
Now we can actually begin limiting.
Start your song at its loudest section.
Usually that’s something like:
- Chorus
- Hook
- Final chorus
- Drop
- Densest part of the instrumental
Slowly increase the Gain or adjust the Threshold so that X-Limit begins reducing peaks.
Don’t immediately push it hard.
Listen.
You might start by hearing what approximately 1–2 dB of gain reduction does to the mix.
Then push farther.
Try 3 dB.
Try 4 dB.
You’re not searching for a specific number.
You’re searching for the point where the record begins sounding worse.
Then you know where the boundary is.
Step 8: Listen to Your Kick
Your kick is one of the first things I’d monitor while increasing limiting.
Before limiting, the kick may feel:
Punchy → Deep → Forward
Push the limiter too hard and it can become:
Flat → Soft → Buried
When that happens, you’re probably asking X-Limit to do too much.
You have several options.
You can back off the limiter.
Or you can return to the mix and control the kick’s peak more effectively.
You might also use a clipper before X-Limit to shave the fastest transient peaks.
The goal is to prevent the kick from forcing your final limiter to work unnecessarily hard.
Step 9: Listen to the 808
The 808 deserves just as much attention.
Low frequencies contain a tremendous amount of energy.
An uncontrolled 808 can trigger your limiter aggressively even when it doesn’t sound excessively loud.
Listen for changes in:
- Low-end weight
- Sustain
- Punch
- Note definition
- Distortion
- Interaction with the kick
If the 808 begins shrinking every time the limiter works, don’t automatically keep pushing.
Your mix may need better low-end control.
This is why mastering begins with a good mix.
Step 10: Listen to the Snare
Snares are another excellent indicator.
A great Hip Hop snare should usually retain some sense of attack.
If your snare suddenly moves backward in the mix as you increase loudness, X-Limit is probably flattening too much of the transient.
Back off.
The difference between a powerful loud master and a crushed master is often found in these tiny transient details.
Step 11: Listen to the Vocal
For R&B especially, the vocal is everything.
As you increase limiting, pay attention to whether the vocal remains:
- Clear
- Smooth
- Forward
- Natural
- Emotionally expressive
Heavy limiting can make vocals feel aggressive.
Sibilance may also become more noticeable because you’re reducing the dynamic contrast between the loudest and quieter parts of the mix.
If your beautiful smooth vocal suddenly sounds harsh after mastering, don’t assume you need more EQ.
First bypass the limiter.
The limiter may be causing the problem.
Step 12: Use Auto Release
Release determines how quickly X-Limit stops reducing gain after a peak.
This can dramatically affect the groove of Hip Hop and R&B.
A poor release setting can cause obvious pumping.
X-Limit includes Auto Release, which adapts its behavior according to the incoming signal.
That’s an excellent place to start.
Enable Auto Release and listen.
If everything sounds natural, you may not need to touch anything else.
Manual Release becomes more useful when you’re deliberately trying to shape how the limiter moves with the rhythm.
Step 13: Experiment with Lookahead
Lookahead allows X-Limit to anticipate incoming peaks.
This can help achieve cleaner limiting.
For transparent mastering, I’d start with Lookahead enabled.
Then A/B it.
Listen specifically to:
Kick → Snare → Percussion → Vocal consonants
You’re listening for transient clarity.
If one setting preserves the groove better, choose it.
Don’t select settings simply because they’re theoretically more advanced.
Choose what sounds better.
Step 14: Use Gain Match
This might be the most important button in your mastering session.
Why?
Because humans are incredibly easy to fool with loudness.
Play two identical mixes at slightly different levels and most people will prefer the louder one.
That makes evaluating a limiter difficult.
You’ve just added several decibels of loudness.
Of course it sounds exciting.
But did the actual sound quality improve?
Enable Gain Match.
Now compare the processed master with the original mix at more comparable levels.
Ask yourself:
Is the kick still punchy?
Does the vocal still sound natural?
Is the stereo image intact?
Does the 808 still feel deep?
Does the song still breathe?
If the quieter premaster suddenly sounds bigger and punchier, you’ve probably pushed the limiter too hard.
Step 15: Watch the Stereo Image
X-Limit includes Ducking and Steering meters along with Channel Link control.
These tools help you understand how limiting is affecting the stereo signal.
This matters because heavy limiting can alter the perceived width and stability of your master.
You may have spent hours creating:
- Wide pads
- Background vocals
- Stereo reverbs
- Panned percussion
- Guitar layers
- Synth textures
You don’t want your mastering limiter unnecessarily damaging that image.
Watch the meters, but more importantly, listen.
If the master begins feeling narrower or unstable as you increase limiting, reduce the processing and investigate what’s triggering the limiter.
Transparent vs Glue for R&B Mastering
Transparent isn’t your only option.
Glue can be worth trying for R&B.
Suppose you’ve created a smooth R&B record with:
- Electric piano
- Pads
- Bass
- Soft drums
- Lead vocals
- Background harmonies
Transparent may preserve everything perfectly.
But Glue might create a slightly more cohesive presentation.
A/B them.
Don’t assume one is better.
Sometimes a tiny change in limiter behavior is enough to make the entire record feel more finished.
Should You Use Punch for Mastering?
Yes—but carefully.
Punch can be extremely useful on drums and buses, but it’s more characterful than Transparent.
That doesn’t mean you can’t master with it.
If you’re working on an aggressive Hip Hop track, Punch might complement the production.
Try it.
But use Gain Match and compare it against Transparent.
If Punch genuinely makes the record feel more energetic without damaging the mix, there’s nothing wrong with using it.
The mode name doesn’t determine whether it’s appropriate.
The result does.
What About Auto Mode?
Auto can be an excellent option when you’re learning X-Limit.
It adapts its behavior according to the incoming material.
If you’re new to mastering, try:
Transparent → Auto → Glue → Punch
at roughly similar loudness levels.
This is a fantastic way to learn what the different limiting styles are actually doing.
You may find Auto works surprisingly well for material with constantly changing dynamics.
How Loud Should Hip Hop and R&B Be?
This question causes producers a lot of unnecessary stress.
There isn’t one universal LUFS number that every Hip Hop or R&B master needs to hit.
Different records have different arrangements, frequency balances, transient structures, and aesthetic goals.
A sparse Trap beat may tolerate aggressive loudness.
A dynamic R&B ballad may sound considerably better with more breathing room.
Don’t destroy your record trying to hit a number you saw online.
Instead, compare your master with professionally released songs in a similar style.
Level-match them.
Then compare:
- Punch
- Low end
- Vocal level
- Brightness
- Width
- Dynamics
- Perceived loudness
Your reference tracks provide context that a single LUFS target can’t.
A Starting SSL X-Limit Setup for Hip Hop
Try this as an initial experiment:
Mode: Transparent
True Peak: On
Ceiling: Around -1.0 dBTP
Auto Release: On
Lookahead: On
Gain Match: Use frequently
Then increase the level until you’re getting some gain reduction.
Listen primarily to:
Kick + Snare + 808
If those three elements survive, you’re moving in the right direction.
Then listen to the vocal and stereo image.
A Starting SSL X-Limit Setup for R&B
For R&B, I’d also begin with:
Mode: Transparent
True Peak: On
Ceiling: Around -1.0 dBTP
Auto Release: On
Lookahead: On
But I’d generally be even more conservative about sacrificing dynamics.
Listen closely to:
Lead vocal + Bass + Kick + Keys + Reverb tails
You want the record to become louder without losing intimacy and depth.
Afterward, compare Transparent against Glue.
Glue may provide a slightly different sense of cohesion.
A More Aggressive Hip Hop Mastering Chain
For louder Hip Hop production, you might experiment with:
EQ → Compression → Saturation → Clipper → SSL X-Limit
The clipper becomes important here.
Instead of forcing X-Limit to handle every huge kick and snare transient, the clipper can shave some of those extremely fast peaks first.
Then X-Limit performs the final limiting.
Think of it as sharing the workload.
Rather than:
X-Limit = 6 dB of work
you might have:
Clipper = some peak control
plus:
X-Limit = additional final control
Depending on the material, that can sound more transparent than asking one processor to do everything.
A Smooth R&B Mastering Chain
For a smoother R&B record, you might use:
EQ → Gentle Compression → Saturation → SSL X-Limit
Everything should be subtle.
You’re polishing.
Not rebuilding.
Your final master should still sound like the mix you loved before you started mastering.
Just more finished.
Common SSL X-Limit Mastering Mistakes
1. Pushing the Limiter Until the Mix Breaks
If the kick disappears and the 808 starts distorting, you’ve probably gone too far.
Loudness isn’t worth destroying the record.
2. Mastering With Your Eyes
Meters are helpful.
They aren’t music.
Don’t choose your settings exclusively because the numbers look right.
Listen.
3. Ignoring Gain Match
Always compare fairly.
Otherwise, louder will repeatedly fool you.
4. Fixing Mix Problems With the Limiter
If your 808 is triggering 8 dB of gain reduction, the limiter may not be the actual problem.
The 808 might need better control in the mix.
5. Forgetting the Loudest Section
Your limiter settings need to survive the loudest part of the song.
Don’t set everything during a quiet verse and assume the chorus will behave the same way.
6. Copying Someone Else’s Settings
Another producer’s Threshold setting means almost nothing for your song.
Their incoming level is different.
Their mix is different.
Their arrangement is different.
Their transients are different.
Learn the principles instead.
How to Know When You’re Done
Here’s one of the best mastering tests.
Bypass X-Limit.
Level-match the comparison.
Listen.
Then enable X-Limit.
Your mastered version should ideally feel:
More controlled.
More polished.
More finished.
Competitively loud.
But it should still retain:
Punch.
Depth.
Width.
Low-end weight.
Vocal clarity.
Groove.
If you’re gaining loudness while losing everything else, the tradeoff isn’t worth it.
Back off.
Final Thoughts: Mastering Hip Hop & R&B with SSL X-Limit
SSL X-Limit gives Hip Hop and R&B producers a flexible way to approach the final stage of a record.
Start with Transparent when your goal is clean loudness.
Experiment with Glue when an R&B record could benefit from additional cohesion.
Try Punch when you’re mastering something aggressive and want the limiter’s character to contribute to the energy.
Use Auto when you want an adaptive starting point.
But whichever mode you choose, the philosophy should remain the same:
Don’t chase loudness at the expense of the record.
Listen to your kick.
Listen to your snare.
Listen to your 808.
Listen to your vocal.
Listen to the stereo image.
And use Gain Match to make sure you’re actually improving the sound rather than simply making it louder.
When used properly, X-Limit shouldn’t make you think:
“Wow, I can really hear that limiter.”
It should make you think:
“This sounds like the finished record.”
That’s ultimately the goal of mastering.
And that’s where SSL X-Limit can earn its place at the end of your Hip Hop and R&B mastering chain.