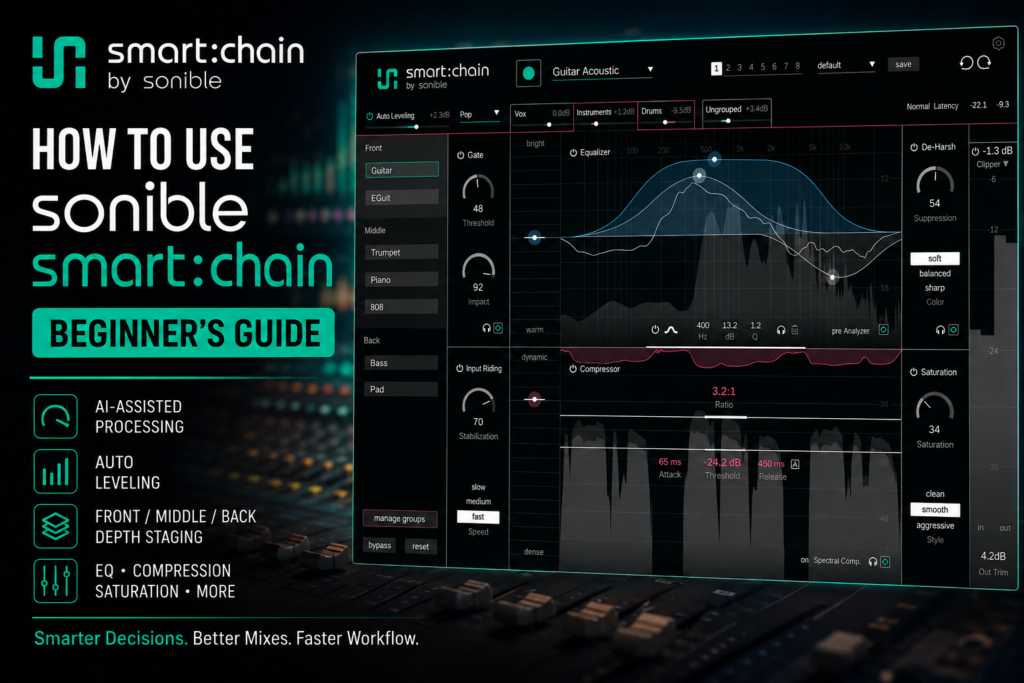
 How To Use sonible smart:chain: Beginner’s Guide
Mixing can become complicated surprisingly fast.
You start with an EQ. Then you add a compressor. Maybe the track sounds harsh, so you add another processor. The levels aren’t consistent, so you adjust gain. Then you add saturation for character.
Before long, one track has five or six plugins on it—and you still have an entire song left to mix.
sonible smart:chain takes a different approach.
Instead of building a traditional mixing chain one plugin at a time, smart:chain combines multiple processing stages into a single intelligent channel strip. More importantly, it can analyze your audio, create processing starting points, and communicate with other smart:chain instances throughout your session.
For beginners, that makes smart:chain especially interesting.
You don’t have to know the perfect EQ frequency or compressor setting before getting started. The plugin can help establish an initial direction, while still giving you enough control to learn what each processor is actually doing.
In this beginner’s guide, we’ll walk through how to use sonible smart:chain step by step, from analyzing your first track to using Auto Leveling and depth staging across an entire mix.
What Is sonible smart:chain?
sonible smart:chain is an intelligent channel-strip plugin designed to bring several common mixing processes into one interface.
Instead of loading separate plugins for different jobs, smart:chain gives you access to processing including:
- Gate
- Input Riding
- Equalization
- Compression
- De-Harshing
- Saturation
- Output level control
But simply combining processors isn’t what makes smart:chain different.
The bigger idea is shared intelligence.
smart:chain analyzes the source and uses that understanding to establish intelligent processing suggestions. When you use multiple instances throughout a project, those instances can also work together to help establish relationships between tracks.
That gives you two levels of mixing.
You can process an individual track, while also considering where that track belongs in the overall mix.
Step 1: Insert smart:chain on Your Track
Start by loading smart:chain as an insert effect on the track you want to process.
You could begin with almost anything:
- Lead vocal
- Kick
- Snare
- 808
- Bass
- Piano
- Guitar
- Synth
- Sample
If you’re completely new to smart:chain, I’d recommend starting with one important track rather than immediately placing the plugin across your entire project.
A vocal, piano, guitar, or drum track is a good choice because you’ll usually be able to hear the processing clearly.
Once you understand what the plugin is doing, you can expand smart:chain across the rest of the mix.
Step 2: Choose the Appropriate Profile
Near the top of smart:chain you’ll find the source profile.
This tells smart:chain what type of material you’re asking it to analyze.
For example, if you’re processing an acoustic guitar, select an appropriate guitar profile. If you’re working with vocals, choose the profile that most closely represents the vocal source.
Don’t overthink this step.
You’re essentially giving smart:chain some context before it analyzes the audio.
The more accurately you describe the source, the more useful its starting point should be.
Step 3: Let smart:chain Learn the Audio
This is where the intelligent part of the workflow begins.
Start the learning process and play a representative section of your track.
Try to use a section that accurately represents how the instrument behaves throughout the song.
For example, if you’re analyzing a lead vocal, don’t only analyze a quiet intro if the singer becomes significantly louder during the chorus.
Give smart:chain useful material.
Once the analysis is complete, the plugin can establish intelligent processing settings based on what it heard.
This is your starting point, not your finished mix.
That’s one of the most important concepts to understand when learning smart:chain.
Step 4: Compare Before and After
Before changing anything, listen.
Bypass smart:chain.
Then turn it back on.
Ask yourself:
What changed?
Maybe the track sounds:
- Clearer
- More controlled
- Less harsh
- More balanced
- More present
- More consistent
Or perhaps you don’t like something the intelligent processing changed.
That’s completely fine.
The purpose of the analysis isn’t to tell you what your mix must sound like. It’s to give you a useful place to begin.
From here, you can start exploring the individual modules.
Understanding the smart:chain Modules
You don’t need to master every processor immediately.
Instead, understand the basic job each one performs.
Gate
The Gate helps reduce unwanted sound when the desired signal isn’t present.
This can be useful on recorded material such as vocals, drums, guitars, or other live instruments.
The two important controls you’ll encounter are Threshold and Impact.
Threshold determines when the gate begins reacting.
Impact determines how strongly the gating affects the signal.
For beginners, avoid trying to eliminate every tiny bit of background noise.
Listen for natural results.
If words, drum hits, or instrument transients suddenly disappear, you’ve probably gone too far.
Input Riding
Input Riding helps stabilize the level of the incoming signal before it reaches later processing.
Imagine a vocal performance where one phrase is quiet and the next is significantly louder.
Without level control, the compressor has to react very differently to each phrase.
Input Riding can help smooth those variations first.
The Stabilization control determines how strongly smart:chain attempts to stabilize the incoming signal.
You’ll also find different speed settings.
For natural sources such as vocals, don’t automatically assume faster is better.
Listen for smoothness.
You want level consistency without removing the natural dynamics of the performance.
Equalizer
The Equalizer is where you shape the frequency balance of the track.
smart:chain can create an intelligent EQ starting point based on its analysis.
You may see processing that helps control excessive frequency areas or brings attention to areas that improve the sound.
Here’s the beginner mistake to avoid:
Don’t assume a complicated EQ curve is automatically better.
Listen.
If the intelligent EQ improves the track, great.
If it makes the instrument too thin, bright, dark, or unnatural, adjust it.
You can use smart:chain’s suggestion as a learning opportunity.
Ask:
What frequencies did smart:chain change, and why might those frequencies have been causing a problem?
That’s how an intelligent tool can actually help you become a better mixer.
Compressor
Compression controls dynamics.
In simple terms, it helps reduce the difference between louder and quieter portions of a signal.
Inside smart:chain you’ll encounter familiar compression controls such as:
- Ratio
- Attack
- Threshold
- Release
Threshold
Determines when compression begins.
Ratio
Determines how strongly the signal is compressed once it crosses the threshold.
Attack
Controls how quickly compression reacts.
Release
Controls how quickly the compressor stops reducing gain.
Beginners often make the mistake of watching compressor numbers instead of listening to the track.
Don’t worry about finding a magical ratio or attack time.
Listen for the result.
On drums, you might want compression that maintains punch.
On vocals, you might want smoother and more consistent dynamics.
On bass, you may want a stable foundation.
The correct setting depends on what the song needs.
De-Harsh
The De-Harsh section helps control unpleasant or overly aggressive frequency energy.
This can be particularly useful on:
- Vocals
- Cymbals
- Hi-hats
- Guitars
- Bright synths
- Samples
- Percussion
The Suppression control determines how much harshness reduction is being applied.
You’ll also find tonal options that change the character of the processing.
For beginners, use De-Harsh carefully.
It’s easy to hear a bright sound and immediately assume brightness is bad.
It isn’t.
Brightness can provide clarity and excitement.
You’re trying to reduce unpleasant harshness, not remove all high-frequency energy.
Saturation
Saturation adds harmonic character.
This can help a source feel:
- Warmer
- Thicker
- More aggressive
- More energetic
- More present
smart:chain provides different saturation characteristics, allowing you to move from cleaner processing toward stronger coloration.
Saturation can be especially useful on drums, bass, 808s, vocals, synths, and samples.
Again, moderation matters.
If you can clearly hear distortion when you don’t want distortion, back the processing down.
Sometimes the best saturation is something you notice more when it’s removed than when it’s active.
Step 5: Adjust the Intelligent Starting Point
Once you understand the modules, go through them individually.
Don’t change everything simultaneously.
Try this workflow:
Bypass Gate → Listen
Enable Gate → Listen
Then do the same with Input Riding.
Then EQ.
Then Compression.
Then De-Harsh.
Then Saturation.
This teaches you something extremely important:
What each processor contributes to the final sound.
If you simply activate everything and listen to the complete chain, you might know that the track sounds better without understanding why.
Learning the individual modules turns smart:chain into more than an automatic mixing tool.
It becomes a mixing education tool.
Step 6: Add smart:chain to Other Tracks
Once you’re comfortable processing one source, start adding smart:chain to additional tracks.
For a Hip Hop or R&B production, you might eventually have instances on:
Drums
- Kick
- Snare
- Drum bus
Low end
- 808
- Bass
Music
- Piano
- Electric piano
- Synth
- Guitar
- Samples
Vocals
- Lead vocal
- Background vocals
- Vocal bus
You don’t necessarily need smart:chain on every single track.
Use it where it provides value.
The important thing is that multiple instances unlock one of the plugin’s biggest advantages: mix-wide communication.
Step 7: Organize Tracks Into Groups
As your smart:chain session grows, you can organize tracks into groups.
For example:
Vox
Lead vocal, doubles and background vocals.
Instruments
Piano, guitar, synths and samples.
Drums
Kick, snare and percussion.
Grouping makes larger sessions easier to manage and helps you think about your mix in sections rather than as dozens of unrelated tracks.
This becomes particularly useful when you’re working with a full production.
Step 8: Use Front, Middle and Back Depth Staging
This is one of my favorite concepts in smart:chain because it teaches something beginners often overlook:
Not every sound should occupy the same perceived position in the mix.
smart:chain allows you to organize tracks into:
Front
Sounds that should command attention.
Examples might include:
- Lead vocal
- Snare
- Main melody
Middle
Important supporting elements.
Examples:
- Bass
- 808
- Piano
- Guitar
- Supporting synth
Back
Atmospheric or supporting elements.
Examples:
- Pads
- Textures
- Background effects
- Supporting percussion
These aren’t rules.
Your arrangement might require completely different choices.
The value comes from asking yourself:
Where should the listener perceive this sound?
That’s a much more musical question than simply asking:
How loud should this track be?
Example R&B Depth Setup
Imagine you’re mixing a Trap Soul/R&B record.
You might try:
Front: Lead vocal, snare
Middle: 808, electric piano, main synth
Back: Pads, atmospheric textures, background melodies
Now your mix has an intentional hierarchy.
The listener isn’t being asked to focus on everything simultaneously.
Step 9: Try Auto Leveling
Once you’ve analyzed multiple tracks, you can explore Auto Leveling.
This feature helps establish an initial balance between learned tracks.
Think of it as creating a rough static mix.
Instead of spending the first part of your mixing session repeatedly moving every fader up and down, smart:chain can establish a starting relationship between your tracks.
Then you refine it.
That’s an important distinction.
Auto Leveling shouldn’t mean:
“The levels are finished.”
It should mean:
“Now I have somewhere useful to start.”
Listen to the entire song afterward.
Maybe the vocal needs another dB.
Maybe the 808 needs to come down slightly.
Maybe you want the snare considerably louder because that’s part of your production style.
Make those decisions.
The technology establishes relationships.
You establish taste.
Step 10: Make Decisions in Context
This might be the most important mixing lesson in this entire guide.
Stop soloing everything.
Solo mode is useful when you’re diagnosing a specific problem.
But listeners don’t hear your piano soloed.
They hear the piano with:
Vocals.
Bass.
Drums.
Synths.
Effects.
Everything.
A piano that sounds slightly thin by itself might fit perfectly underneath a vocal.
An enormous 808 might sound amazing soloed but completely destroy the kick when everything plays together.
Once smart:chain has established its initial processing, spend most of your time listening in context.
That’s where the real mixing decisions happen.
Beginner smart:chain Workflow
If all of this feels like a lot, here’s a simple workflow you can use on your next production:
- Insert smart:chain on an important track.
- Select the appropriate source profile.
- Play a representative section and analyze the track.
- Compare the processed and bypassed versions.
- Listen to each processing module individually.
- Adjust anything that doesn’t serve the song.
- Add smart:chain to other important tracks.
- Organize related tracks into groups.
- Assign Front, Middle, and Back depth positions.
- Try Auto Leveling.
- Play the entire song.
- Refine everything manually by ear.
That final step never disappears.
AI can accelerate your workflow.
It cannot decide what you want the record to feel like.
How I’d Use smart:chain on a Hip Hop or R&B Beat
For a typical beat, I wouldn’t immediately throw smart:chain onto 40 tracks.
I’d start with the musical foundation.
Kick
Use the intelligent processing as a starting point, but make sure the kick retains its punch.
808
Focus on consistent dynamics and its relationship with the kick.
Avoid processing the 808 purely to make it sound enormous in solo.
Snare
Maintain the transient and presence needed to cut through the production.
Main Instrument
Whether it’s piano, electric piano, guitar, or synth, use EQ and dynamics to create room for the vocal.
Supporting Instruments
Consider placing these farther back in the depth hierarchy.
Lead Vocal
Use Input Riding, EQ, compression, and De-Harsh as starting points for a controlled vocal chain.
Once those major elements are working, I’d use smart:chain’s session-wide features to establish the overall balance.
That’s a much more controlled approach than letting AI process everything before you’ve even decided what matters in the song.
Five Beginner Mistakes to Avoid
1. Accepting every intelligent setting without listening
AI processing is a suggestion, not a command.
2. Over-processing
If a track already sounds good, it may not need aggressive EQ, compression, saturation, and de-harshing.
3. Mixing entirely in solo
Always return to the full mix.
4. Putting everything in the Front
If everything is important, nothing feels important.
Use depth intentionally.
5. Ignoring gain and loudness differences
Louder frequently sounds “better” during quick comparisons. When evaluating processing, try to compare similar perceived loudness levels so you’re judging the actual tonal and dynamic changes.
Can smart:chain Teach You How to Mix?
It can help—but only if you use it correctly.
Here’s what I’d recommend for beginners.
Whenever smart:chain analyzes something, study the result.
If it cuts a frequency, listen to that area.
If it applies compression, watch how the dynamics change.
If De-Harsh activates, listen for the frequency character it’s controlling.
If Input Riding stabilizes a vocal, compare the dynamics before and after.
Then start changing things.
You may eventually realize:
“I understand why it compressed this.”
Or:
“I hear why that EQ adjustment helped.”
That’s where the real value appears.
You’re no longer blindly following the plugin.
You’re developing your ears.
Is sonible smart:chain Easy to Use?
The basic workflow is surprisingly approachable.
You can analyze a track and get useful starting settings without understanding every advanced mixing concept.
The deeper workflow takes more time to learn because smart:chain isn’t merely a single-track processor.
Once you start using multiple instances, groups, depth staging, and Auto Leveling, you’re essentially using it as a larger mixing system.
That’s also what makes it interesting.
A beginner can start simple and gradually incorporate more of the workflow as their mixing skills improve.
Final Thoughts
Learning how to use sonible smart:chain isn’t really about finding a magic AI button.
The better approach is:
Let smart:chain handle some of the analysis.
Use its processing as a starting point.
Listen to what it changed.
Adjust those decisions yourself.
Then use the session-wide features to start thinking beyond individual tracks.
That’s where smart:chain becomes especially valuable.
Features such as multi-instance communication, Auto Leveling, grouping, and Front/Middle/Back depth staging encourage you to think about the relationship between sounds rather than endlessly trying to make every instrument sound perfect in isolation.
And that’s one of the biggest transitions every beginner has to make when learning how to mix.
A great mix isn’t a collection of individually perfect sounds.
It’s a collection of sounds that work together.
For beginners, smart:chain can help you get there faster—while still leaving the final decisions in your hands.
Frequently Asked Questions
How do I start using sonible smart:chain?
Insert smart:chain on a track, choose an appropriate source profile, play a representative section of audio during the learning process, and use the resulting processing as your starting point. Listen to each module and make manual adjustments afterward.
Should I put smart:chain on every track?
Not necessarily. Start with the most important elements of your production and expand from there. Using multiple instances allows you to take advantage of smart:chain’s session-wide features, but that doesn’t mean every minor sound requires processing.
What should I put in the Front, Middle, and Back?
Place elements according to the hierarchy you want the listener to perceive. Lead vocals and important rhythmic elements might sit toward the Front, supporting instruments in the Middle, and atmospheric sounds toward the Back. There is no universal arrangement.
Is Auto Leveling the same as automatically mixing my song?
No. Treat Auto Leveling as an intelligent starting balance. You should still listen through the song and manually adjust levels according to your production and creative direction.
Should beginners use the automatic settings?
Yes—as starting points. The best learning approach is to compare the intelligent settings with the unprocessed signal and investigate why each processing decision changes the sound.
Can I still change smart:chain’s settings manually?
Yes. That’s one of the most important parts of the workflow. The intelligent processing doesn’t eliminate your ability to shape the final result.
The Bottom Line
Use sonible smart:chain as an assistant, not an autopilot.
Let it analyze your tracks, establish useful starting points, and help organize the relationships across your mix.
Then trust your ears.
The more you understand why you’re changing smart:chain’s suggestions, the less you’ll depend on those suggestions—and the better mixer you’ll become.