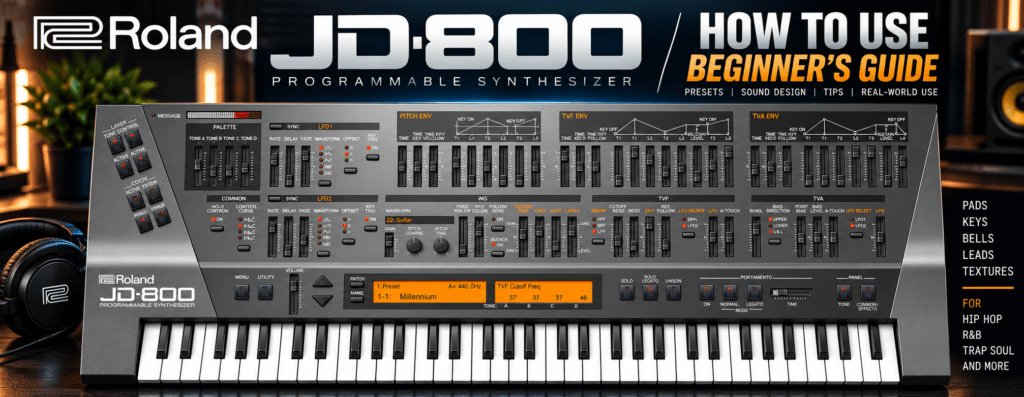
 The Roland JD-800 is the kind of synthesizer that can look intimidating the first time you open it.
There are sliders everywhere.
You have multiple envelopes, filters, LFOs, effects, and four separate Tones that can be combined to create a single sound. If you’re new to synthesis, it might seem like you need to understand every control before you can make anything useful.
You don’t.
In this How To Use Roland JD-800 beginner’s guide, we’ll break the instrument down into a simple workflow so you can start choosing sounds, modifying presets, creating your own patches, and using the JD-800 in actual productions.
And if you make Hip Hop, R&B, or Trap Soul, I’ll also show you some practical ways to use the JD-800 without making your tracks sound like they came straight out of the early ’90s.
What Is the Roland JD-800?
The Roland JD-800 Software Synthesizer recreates Roland’s original JD-800 hardware synthesizer, introduced in 1991.
One of the things that made the original instrument unusual was its interface.
While many digital synthesizers of the period relied heavily on menus, the JD-800 put a huge number of sound-design controls directly in front of the musician.
Roland’s software version brings that approach into your DAW while recreating the original waveform data and JD-800 architecture.
The heart of the instrument is surprisingly easy to understand:
Waveform → Filter → Amplifier → Effects
The JD-800 simply lets you do this across multiple layers.
Once you understand that concept, the interface becomes considerably less intimidating.
Step 1: Load the JD-800 in Your DAW
After installing and authorizing the JD-800, create a software instrument or MIDI track in your DAW and load the JD-800.
Depending on your system and DAW, you’ll typically access the plugin through one of its supported formats, including VST3, AU, or AAX.
Once loaded, play a few notes from your MIDI controller.
Before touching anything else, spend a few minutes browsing sounds.
This gives you a reference point for what the JD-800 can do.
Don’t worry about programming yet.
Step 2: Start With the Presets
For a beginner, presets are the fastest way to learn the JD-800.
The software version includes 128 presets, combining sounds based on the original hardware library with additional sounds created for the software instrument.
Instead of thinking of presets as finished sounds, think of them as sound-design templates.
Find something that’s approximately what you need.
For example, maybe you find a pad that has the right atmosphere but is too bright.
Don’t immediately search for another preset.
Modify that one.
This is one of the best habits you can develop when learning synthesis.
Try This
Load a pad.
Play a minor 7th or minor 9th chord.
Then listen for three things:
Is it too bright?
Does it have too much movement?
Does it have too much reverb?
Those three questions already give you somewhere to start editing.
Step 3: Understand Patches and Tones
This is probably the most important concept to understand about the JD-800.
A JD-800 Patch can contain up to four Tones.
Think of a Tone as an individual sound layer.
You have:
Tone A
Tone B
Tone C
Tone D
Each Tone can contribute something different to the final sound.
For example, imagine you’re creating an atmospheric R&B pad.
Your patch could contain:
| Tone | Purpose |
|---|---|
| Tone A | Main warm pad |
| Tone B | Bright digital layer |
| Tone C | Bell-like attack |
| Tone D | Atmospheric texture |
When you press one chord, all of those elements can combine into one larger sound.
This layering architecture is one of the JD-800’s greatest strengths.
Step 4: Turn Tones On and Off
Before you start moving dozens of sliders, there’s a much easier way to understand an existing patch.
Solo the layers.
Take a preset you like and listen to Tone A by itself.
Then Tone B.
Then Tone C.
Then Tone D.
You’ll quickly discover that some complicated JD-800 patches are simply several relatively simple sounds stacked together.
This is also an excellent way to modify presets.
Suppose you love a patch except for a metallic layer.
Solo the Tones until you identify which one is producing that sound.
Then disable it.
You’ve already created your own variation of the preset without knowing advanced synthesis.
Beginner Exercise
Choose one preset and:
- Listen to the complete Patch.
- Solo Tone A.
- Solo Tone B.
- Solo Tone C.
- Solo Tone D.
- Turn individual Tones on and off.
- Rebalance the layers.
Do this with five presets and you’ll understand the JD-800 considerably better.
Step 5: Choose Your Waveform
Each Tone begins with a waveform.
This is the raw material you’re going to shape into a finished sound.
The JD-800’s waveform section is therefore one of the first places to explore when creating something from scratch.
Different waveform choices provide different starting characteristics.
Some may be bright.
Others may be soft, metallic, percussive, or atmospheric.
The important beginner concept is this:
Don’t judge the waveform as if it’s the finished sound.
You’re going to shape it.
Choose something that contains roughly the character you want and continue through the signal path.
Step 6: Understand the Pitch Section
The pitch controls determine the tuning of your Tone.
You’ll find controls that allow you to make larger and smaller pitch adjustments.
This becomes especially powerful when you’re layering Tones.
For example, you could keep:
Tone A: Normal pitch
Tone B: One octave higher
Tone C: Normal pitch
Tone D: One octave lower
Now your patch occupies a much wider frequency range.
But don’t assume wider is always better.
For Hip Hop and R&B, I often prefer leaving plenty of space in the low end for the bass and 808.
That means I would be careful about creating huge low-frequency synth layers unless they’re intentionally replacing the bass.
Step 7: Learn the TVF Filter
Next comes one of the most useful sections for beginners: the TVF, or Time Variant Filter.
You don’t need to understand every filter parameter immediately.
Start with Cutoff.
The cutoff determines how much of the frequency spectrum you’re allowing through the filter.
If a sound feels too bright, lowering the cutoff can make it darker.
That’s incredibly useful for modern R&B and Trap Soul.
Easy R&B Trick
Load a bright digital pad.
Lower the filter cutoff.
Play an extended chord.
Suddenly the sound can become much softer and moodier.
Instead of searching through another 50 presets, you’ve turned the existing patch into something more appropriate for your track.
Step 8: Experiment With Resonance
Near the filter cutoff you’ll also encounter Resonance.
Resonance emphasizes frequencies around the filter’s cutoff point.
A little resonance can add character.
A lot can make the filter considerably more obvious or aggressive.
For beginners, I recommend using resonance conservatively.
Move it slowly while playing the same chord repeatedly.
Listen to what happens.
That’s much more useful than trying to memorize a technical definition.
Step 9: Understand the TVA
The TVA, or Time Variant Amplifier, controls how the volume of your sound behaves.
This is where envelopes become extremely important.
Think about the difference between a piano and a pad.
A piano hits quickly and then fades.
A pad might slowly fade in, sustain while you’re holding the keys, and then gradually disappear after you release them.
The envelope controls that behavior.
The most useful beginner concept is:
Attack = how quickly the sound arrives.
Release = how long the sound takes to disappear after releasing the key.
There’s more to the envelope than those two controls, but Attack and Release are an excellent starting point.
Step 10: Use Attack to Change the Feel
Attack can completely transform a sound.
Short Attack:
Immediate sound.
Useful for:
- Plucks
- Keys
- Leads
- Percussive synths
Longer Attack:
Gradual fade-in.
Useful for:
- Pads
- Background textures
- Ambient layers
- Cinematic sounds
Take a pad preset and increase its attack.
You’ll hear the front of the sound soften.
That’s perfect when you want the harmony to sit behind a vocal rather than competing with it.
Step 11: Use Release to Create Atmosphere
Release determines how the sound behaves after you stop holding the keys.
Short releases feel tighter.
Long releases create tails.
For atmospheric R&B, increasing the release slightly can help chords blend together beautifully.
But be careful.
Long release + lots of reverb + lots of sustain can quickly create a muddy mix.
The goal isn’t necessarily to make the biggest sound possible.
It’s to make the sound fit the production.
Step 12: Explore the LFOs
The JD-800 gives you LFO modulation for adding movement.
An LFO is essentially a repeating modulation source.
Instead of manually moving a parameter over and over, the LFO can move it automatically.
You can use LFOs to create:
- Vibrato
- Filter movement
- Pitch movement
- Pulsing textures
- Evolving pads
For your first few patches, use subtle amounts.
Slow modulation on an atmospheric pad can make the sound feel alive without the listener consciously hearing the effect.
Step 13: Learn the Effects
The effects are a huge part of the JD-800 personality.
The software recreation includes effects based on the original instrument’s processing architecture, including:
- Distortion/Overdrive
- Enhancer
- Spectrum
- Phaser
- Chorus
- Delay
- Reverb
There’s also master EQ.
You don’t need all of them running aggressively at once.
In fact, one of the easiest ways to make vintage synth presets work in contemporary productions is often to reduce the effects.
Chorus
Start here when you want width.
Chorus works beautifully on:
- Pads
- Digital keys
- EP-style sounds
- Atmospheric textures
But listen in the context of the full mix.
Huge stereo patches can sound amazing by themselves and become overwhelming once drums, vocals, bass, and other instruments arrive.
Delay
Delay works especially well with:
- Bells
- Leads
- Plucks
- Sparse keys
Try using delay rhythmically rather than simply making the sound bigger.
A simple melodic phrase can become much more interesting when the repeats interact with the groove.
Reverb
Reverb can transform the JD-800 into an atmosphere machine.
But there’s an important production lesson here:
More reverb doesn’t automatically equal more atmosphere.
Sometimes a shorter reverb with the correct pre-delay and EQ will sound considerably larger in the actual mix.
Step 14: Create Your First JD-800 Patch
Now let’s put everything together.
We’ll make a simple atmospheric R&B patch.
Don’t worry about exact parameter values.
The goal is learning the workflow.
Tone A — Foundation
Choose a smooth waveform.
Keep it around the normal octave.
Lower the filter cutoff slightly.
Use a moderate attack.
Add some release.
This becomes the body of the patch.
Tone B — Shimmer
Choose something brighter.
Raise it approximately one octave.
Reduce its volume.
Keep the filter slightly more open.
Add subtle modulation.
This provides the high-frequency detail.
Tone C — Attack
Choose something with a bell-like or percussive quality.
Use a quick attack.
Lower its level considerably.
This layer should mostly be heard when the chord initially hits.
Tone D — Texture
Choose something atmospheric.
Use a slower attack.
Lower its volume.
Add subtle modulation.
Now blend the four layers.
The key word is blend.
Every Tone doesn’t need to be equally loud.
Some layers might be barely audible but become noticeable when you remove them.
That’s often what creates sophisticated layered sounds.
Step 15: Turn It Into an R&B Chord Sound
Now play something musical.
Try a simple progression using seventh and ninth chords.
For example, in E minor you might experiment with:
Em9 → Cmaj7 → Am9 → Bm7
Don’t worry about playing huge chords in both hands.
Keep the voicings spacious.
You could play the roots with your left hand and extensions with your right.
Once the harmony sounds good, adjust the JD-800 patch while the progression loops.
This is important.
Don’t design sounds completely in isolation.
Design them while the music is playing.
You’ll make better decisions.
Step 16: Make the JD-800 Work With an 808
The JD-800 can create enormous patches.
Your 808 also needs enormous amounts of space.
That can become a problem.
If you’re making Trap Soul or Hip Hop, don’t be afraid to remove low-frequency information from the JD-800.
Let the synth provide:
Harmony + texture + atmosphere
while your 808 provides:
Weight + sub-bass + movement
That separation often produces a cleaner mix than trying to make every instrument sound huge.
Step 17: Create Sample Material
This might be my favorite way to use the JD-800 for Hip Hop.
Instead of treating it like a conventional synth, treat it like your own personal sample generator.
Create an eight-bar progression.
Add:
- Pads
- Bells
- Textures
- Small melodies
Then bounce the entire section to audio.
Now manipulate it.
You can:
- Pitch it down
- Reverse it
- Chop it
- Time-stretch it
- Filter it
- Saturate it
- Resample it
- Rearrange the chops
Now the JD-800 becomes the source material rather than the finished sound.
This can produce something dramatically different from simply loading a factory preset.
Step 18: Don’t Use Every Layer
This deserves its own section because it’s an easy beginner mistake.
Having four Tones available doesn’t mean you need four Tones.
Sometimes one is enough.
Sometimes two are perfect.
If you’re creating a huge atmospheric pad, four layers might make sense.
But if you’re creating a small bell melody above a vocal, four stacked layers might simply create unnecessary clutter.
Use the architecture based on what the song needs.
Step 19: Save Your Own Patches
Once you modify something you like, save it.
Don’t assume you’ll remember how you created it.
Over time, build your own personal JD-800 library.
You could organize patches into categories such as:
R&B Pads
Trap Soul Keys
Dark Textures
Bells
Ambient
Leads
Sample Starters
Now you’re no longer opening the JD-800 and searching through somebody else’s sounds.
You’re developing a personal production toolkit.
That’s when a synthesizer starts becoming part of your sound.
Beginner JD-800 Workflow
If everything we’ve covered feels like a lot, simplify the process to this:
- Choose a preset that’s close to what you want.
- Solo the four Tones to understand the patch.
- Remove any layers you don’t need.
- Adjust the waveform if necessary.
- Use filter cutoff to control brightness.
- Use Attack and Release to shape the envelope.
- Add subtle LFO movement when needed.
- Adjust the balance between Tones.
- Use chorus, delay, and reverb carefully.
- Save the result as your own patch.
You don’t need to master every JD-800 parameter before making music.
Master that workflow first.
5 JD-800 Beginner Mistakes to Avoid
1. Trying to Learn Every Control at Once
Don’t.
Learn one section at a time.
Start with Tones, cutoff, Attack, Release, and effects.
Those alone can dramatically transform presets.
2. Using Too Many Layers
Four Tones can sound massive.
Massive isn’t always useful.
Mute layers until the patch contains only what the song needs.
3. Using Too Much Reverb
A gigantic JD-800 patch covered in reverb sounds incredible when soloed.
Then the vocal arrives.
Suddenly there’s no room.
Design sounds in context.
4. Ignoring the Presets
Preset modification is one of the fastest ways to learn synthesis.
Reverse-engineer sounds you already like.
5. Never Saving Your Sounds
Every useful modification can become part of your personal library.
Save your work.
Is the Roland JD-800 Easy to Learn?
I’d call it beginner-friendly once you understand its architecture.
The interface initially appears complicated because Roland exposes so many parameters simultaneously.
But that can actually become an advantage.
You’re able to see the synthesizer.
Instead of diving through endless menus, you can follow the sound through the different sections and begin understanding what each control does.
Don’t try to memorize the interface.
Experiment with it.
Move one parameter.
Listen.
Reset it.
Move another.
Listen again.
That’s how synthesis starts making sense.
Is the JD-800 Good for Beginners?
Yes, particularly if you’re willing to learn through preset modification.
I wouldn’t recommend beginning by trying to create an elaborate four-Tone patch from an initialized state.
Instead:
Preset → Modify → Understand → Rebuild
That’s a much easier progression.
After modifying 20 or 30 patches, you’ll start recognizing patterns.
You’ll know that you need the filter when something is too bright.
You’ll reach for Attack when you need to soften the beginning.
You’ll understand when a Tone isn’t contributing anything useful.
Eventually, creating patches from scratch won’t feel nearly as intimidating.
Final Thoughts
Learning how to use the Roland JD-800 is much easier when you stop looking at the entire interface and start thinking about the basic signal flow.
Choose a waveform.
Shape the pitch.
Filter it.
Shape the volume.
Add movement.
Add effects.
Then repeat that process across additional Tones when you need more complexity.
That’s really the JD-800.
And for Hip Hop, R&B, and Trap Soul producers, you don’t have to recreate stereotypical ’90s sounds to take advantage of it.
Use the JD-800 as a source of pads, digital keys, bells, atmospheric layers, textures, and original sample material.
Start with presets. Tear them apart. Rebuild them. Save your favorite variations.
Before long, the huge wall of sliders stops looking complicated.
It starts looking like possibilities.